Summary
Summary
The 2025 SAHA SAO consists of two major components:
The BMD 300 contains an nRF52832 which handles LED Driver setup and the SAO proximity function. By using an LED driver the animation of the 5 LEDs does not depend on the processor to keep the appearance smooth. The LED driver operates completely independently of the processor with the sole exception of the proximity indicator which has its state updated periodically based on BLE scans.
The average power consumption of the SAO is 6.5 mA, giving around 30 hours of run time with a 200 mAh CR2032 coin cell battery.

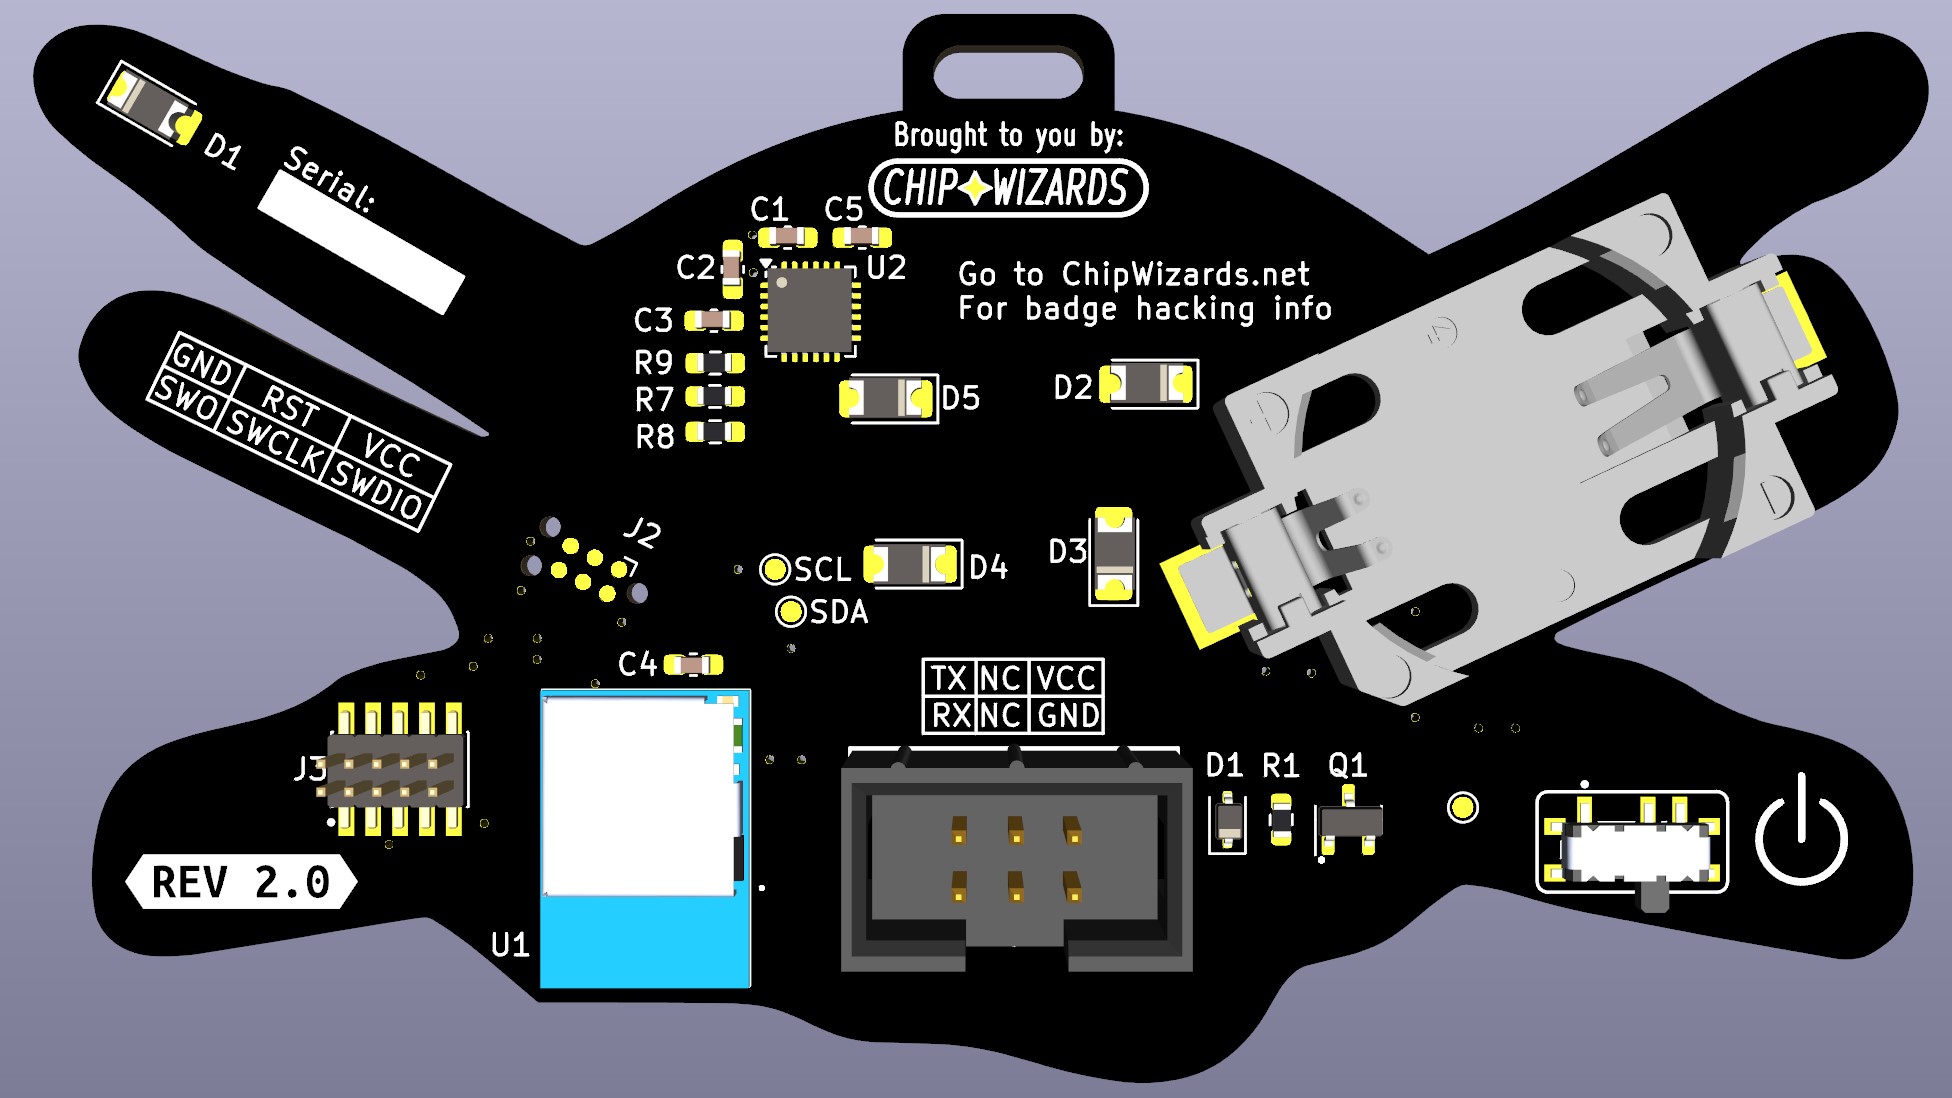
The github repo contains:
- Schematics showing how the SAO is wired
- The TI assembler to build programs for the LP55231 LED Driver
- Source code for the SAO firmware
- Datasheets for the LED Driver and nRF Module
Proximity Feature
The proximity feature works by each SAO simultaneously broadcasting and receiving beacons. The PWM duty cycle of D1 (the soldering iron) is determined by the RSSI of received beacons. If there are multiple beaconing SAOs being received D1 will appear to switch between multiple brightness settings, this is an intentional choice to help represent multiple beacons being received.
Headers
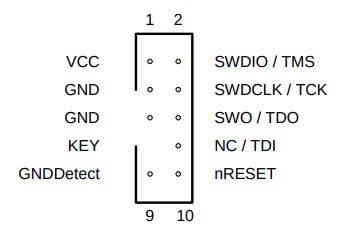
There is an SWD header for flashing and debugging custom firmware that follows the SWD standard.
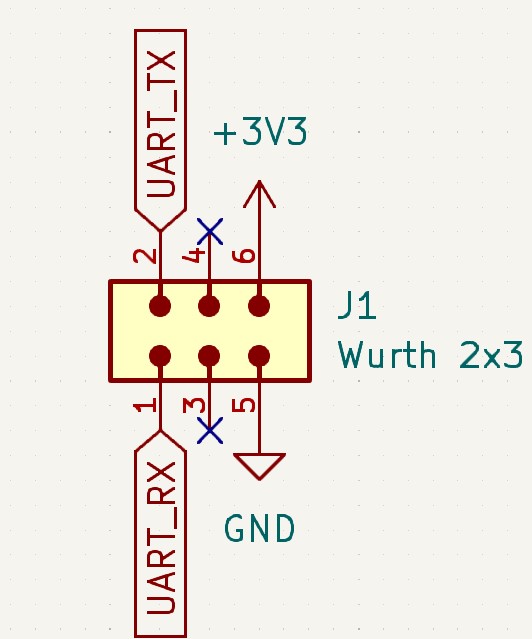
The SAO header in the center follows the SAO standard with the addition of TX and RX in case there are users who wish to use a carrier badge to communicate with the SAO via UART.
Debugging
Users wanting to flash custom firmware will need a debugger to do so. The nRF SDK is built around the JLink line of debuggers from Segger, these are going to be the most tightly integrated debuggers for this set up. The Segger JLink Edu Mini will be the most cost effective, costing $60 instead of several hundred.
The best places to buy these would be here:
- Mouser (Fastest)
- Direct from Segger
It may be possible to use other SWD capable debuggers to program the SAO using OpenOCD. These other debuggers won’t be integrated into nRF’s IDE (vscode) correctly but will work outside of it.
Getting started with custom firmware
The nRF academy has the best documentation for setting up their SDK. It’s worth walking through Lesson 1 to set up the SDK and learn how to build examples. Beyond Lesson 1 is a good primer for developing firmware for nRF devices but the later lessons are not required reading for tinkering with the SAO.
Assuming the nRF academy instructions have been followed:
To load in the firmware project open the nRF connect plugin, select Open an existing application and navigate to software/saha_sao inside the SAHA SAO repo.
Next, select add build configuration under the APPLICATION pane and select the Build for nRF52 DK nRF52832 (build/saha_sao) CMake preset is highlighted then select Generate and build.
From there it should be possible to build the project!
WARNING
Base configuration filesfield should beprj.conf
Writing programs for the LED Driver
The LP55231 LED Driver has 3 lighting engines which enable various lighting effects. Currently the SAO only uses the first engine, but it’s possible to use all 3 if desired. To write programs for the assembly engines a user will have to use the TI Assembler from within the SAHA-SAO repo.
The following resources were used during SAO development to write the animations, these resources contain tutorials on how to write assembly for the engines and how the engines themselves function:
To bundle in the lighting program there is a global constant array name led_program in src/main.c.
The contents of that array are taken from the .lst generated by the TI assembler.
For example, the .lst for the default SAHA animation can be found in software/led_driver/SAHA.lst.
Upon viewing this file it is clear that the current led_program is directly derived from the generated .lst.
To update the animation a user must change led_program to mirror their own generated .lst file.
The LED engine also has its own entry point and program counter so it’s crucial that these are updated whenever changes to code are made.
Changes must be made to the calls to set_engine_entry and set_engine_pc within the pled_init function in src/main.c.
Both set_engine_entry and set_engine_pc must point to the first valid instruction inside of the animation program.
WARNING
It is crucial to updateled_program,set_engine_entryandset_engine_pcwhenever making changes to the animation program.